Recording Studios

DaVinci Resolve: Learning the Interfaces

DaVinci Resolve is a very powerful open-source video editing program. Its strength lies in its segmented workflow, allowing the user to work on the project in stages from beginning to completion. The variety of different interfaces the program presents you with may be daunting and confusing at first, but it gives you different opportunities to change the interface to suit your needs. In this tutorial, I will show you the different interfaces for each “stage” of post-production; then I will demonstrate how to customize those given interfaces.

If you don’t already have DaVinci Resolve, you can download the program for free here.

The Basics
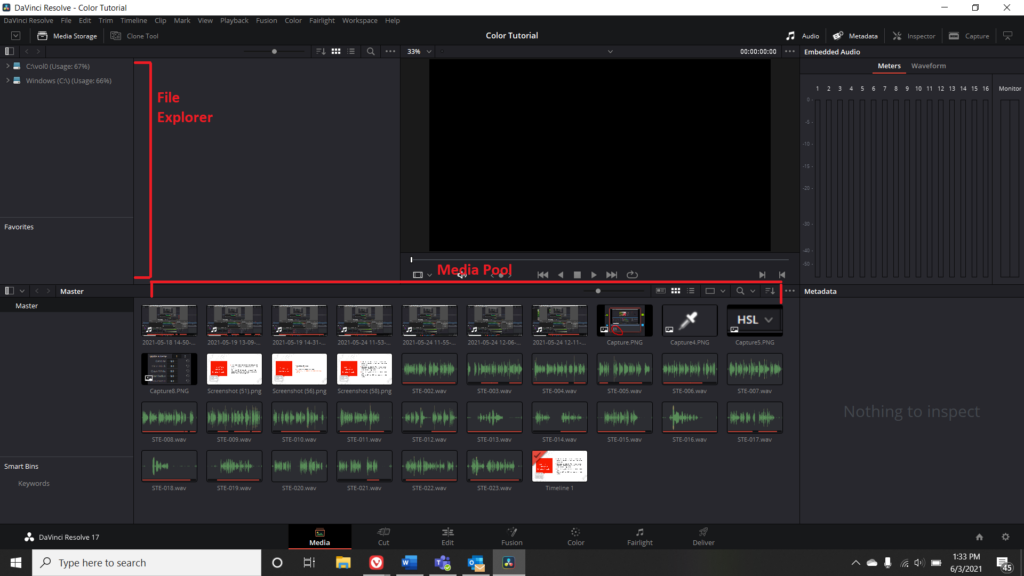
Media Menu

Screenshot of the Media Menu in DaVinci Resolve with File Explorer and Media Pool highlighted

The first stage of post-production is assembling your project files. In the file explorer, it is important to keep all of the files you plan to use in your project in the same directory. From that directory, you can import you files by right-clicking and selecting “Add Into Media Pool” or by dragging it into the media pool (the bottom panel). You can also drag your files from the Windows File Explorer to the Media Pool. In the middle-center of the interface is the preview panel, where you can preview a file before importing it. On the right side is an audio panel, which provides equalizer and waveform representations of audio levels, and the metadata panel, which includes embedded information about the file.

Cut Menu

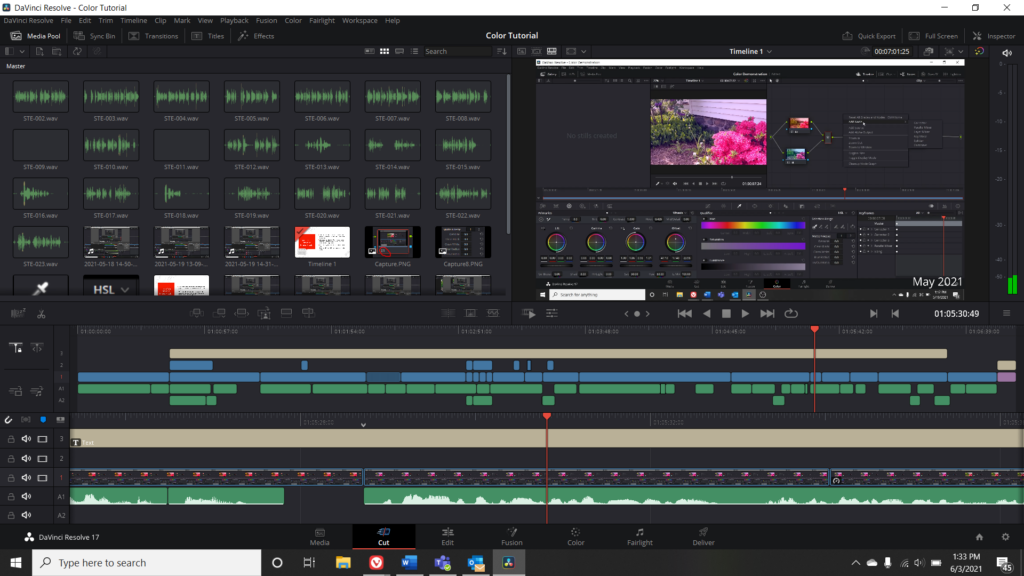
Screenshot of the Cut Menu in DaVinci Resolve

The Cut Menu is an interesting addition to the editing process. While you are able to cut your clips in the next menu (the edit menu), the cut menu has a specific view that allows you to focus in on a specific spot you want to cut. This is set up like an old school film cutting machine where the cutting line is fixed in the center and the clip is moved from left to right. This view is best suited for trimming down your clips to the length you want them to be before moving onto more complicated edits.

Edit Menu

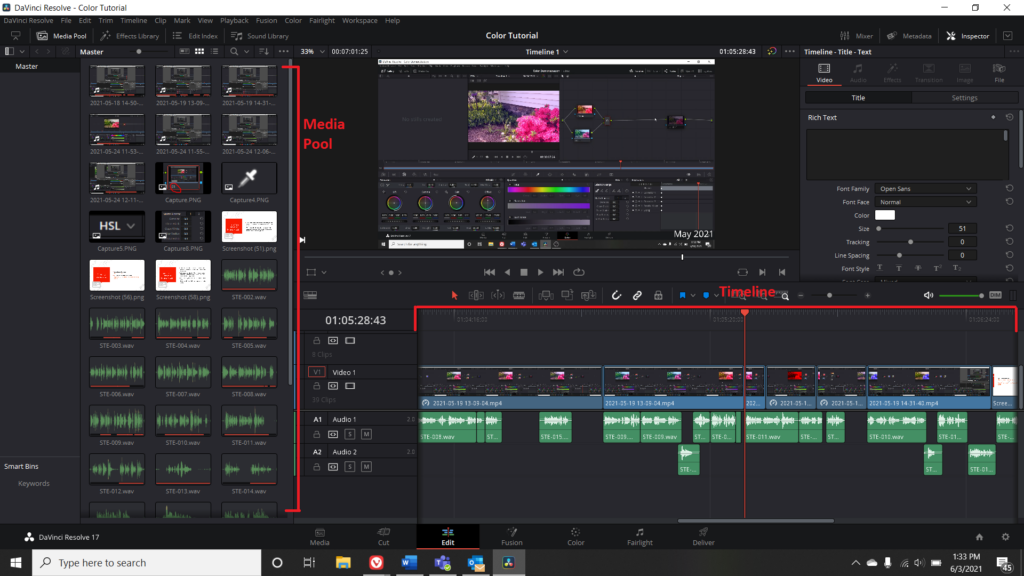
Screenshot of Edit Menu in DaVinci Resolve, with Media Pool and Timeline highlighted

The Edit Menu is the menu that is most similar to other video editing programs. The interface has multiple audio and video tracks, and more can be added by right-clicking. By default, the timeline is on the bottom, the timeline preview is on top, and the media library is to the left.

Fusion Menu

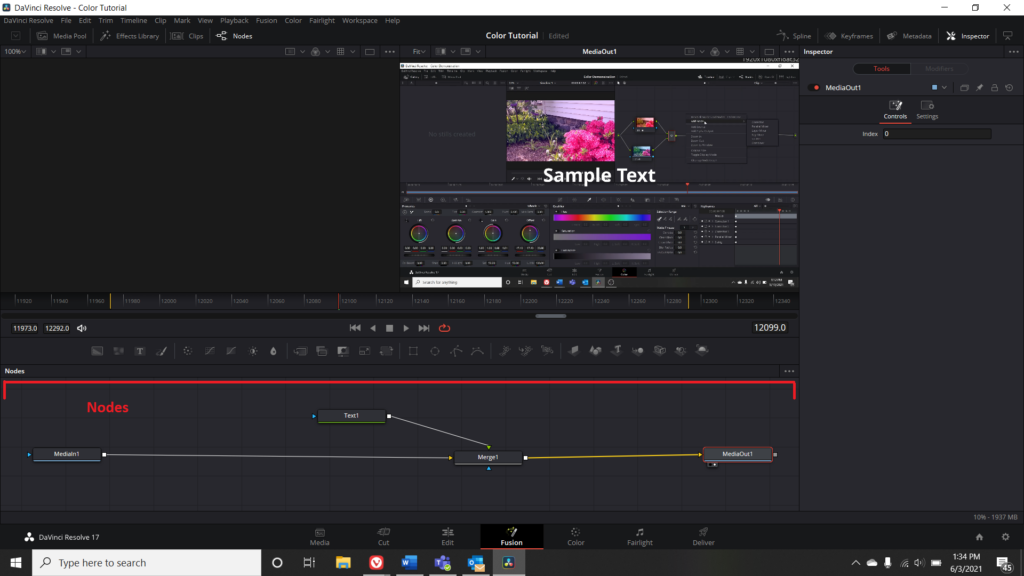
Screenshot of Fusion Menu in DaVinci Resolve with Nodes highlighted

Fusion is Resolve’s interpretation of compositing and effects in the post-production process. In many video editing suites, the composites and effects would be applied directly to the timeline. Here, it’s on its own menu with its own interface and workflow to apply effects. The effects are applied by creating a chart with lines that connect to the in and out video points of the clip. You can add bubbles, called Nodes, to the chain of effects that represent text, noise, and other image transformations. Since this process may be unfamiliar to many, the Recording Studios has a video tutorial that explains how to use Fusion in more detail.

Color Menu

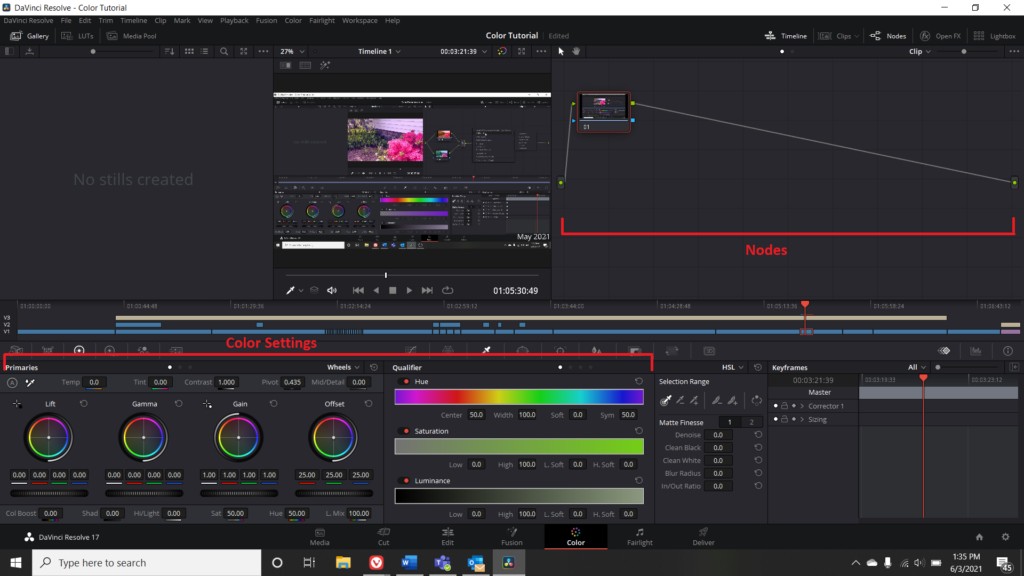
Screenshot of the Color Menu in DaVinci Resolve with Color Settings and Nodes highlighted

Like the Fusion Menu, the Color Menu also has a chart-and-node-based interface for applying effects. In this menu, the nodes panel is in the right side of the window by default instead of the bottom of the window. The bottom panel on the Color Menu contains several effects related to color correction, including wheels that tweak the values of different light and dark parts of the image, and a center channel that can be changed between multiple different menus, including color curves, windows, and qualifiers. There is a video tutorial on how to use the Color Menu.

Fairlight Menu

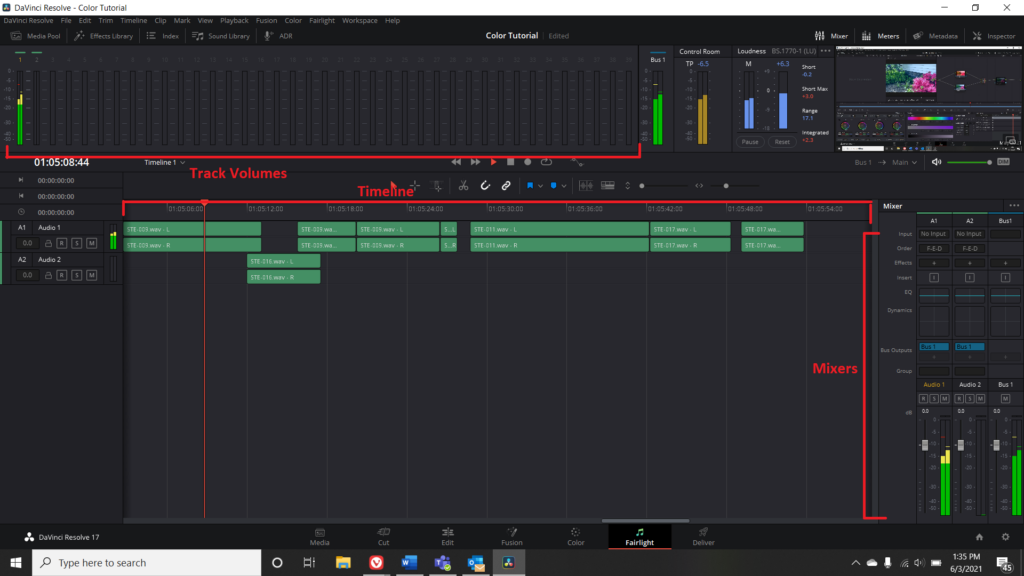
Screenshot of the Fairlight Menu in DaVinci Resolve with Track Volumes, Timeline, and Mixers highlighted

The Fairlight Menu is an in-depth sound mixing interface. At the top of the interface is a row of equalizer bars that displays up to 39 audio tracks at once, as well as control room and loudness levels. The bottom half of the interface displays a timeline of all the audio tracks so they can be trimmed and edited, and the right side of the interface has mixers for the output audio.

Deliver Menu

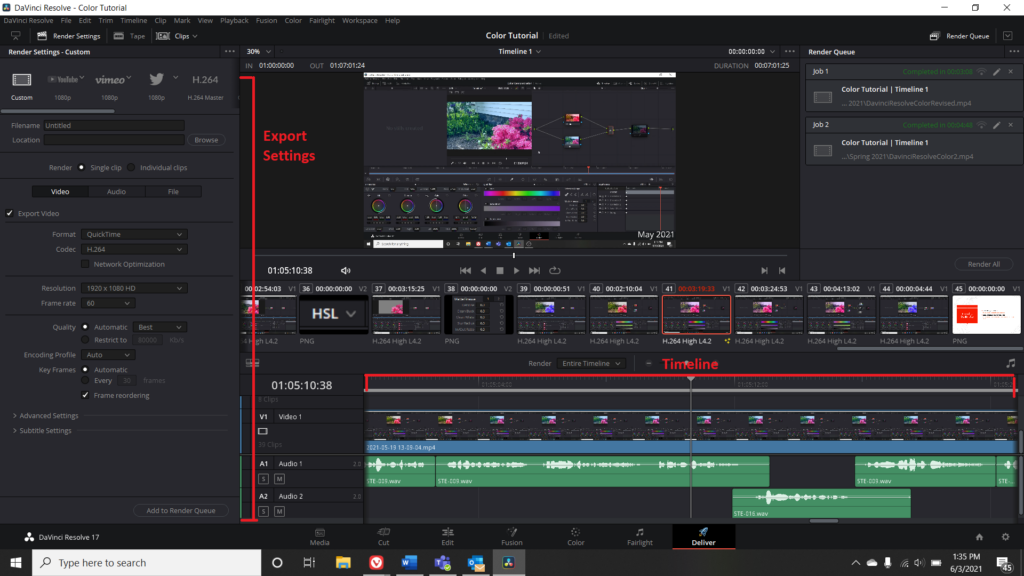
Screenshot of Deliver Menu in DaVinci Resolve with Export Settings and Timeline highlighted

Deliver is the final stage of post-production, in which you select the settings that best optimize the project for export to a video file. It provides a timeline view to make any last minute changes to the project, as well as a view above that of all the clips that you have added to the timeline. You can click on any of these clips and it will take you to the part of the timeline where that clip is located. On the left side of the Deliver Menu is the export settings. You can choose from a number of different presets that fit commonly used website formats, or make a custom choice of the format, resolution, and directory. After selecting those, you add the project to the render queue on the right side of the window, then select “render all” to start exporting your projects.

Customizing Your Interfaces
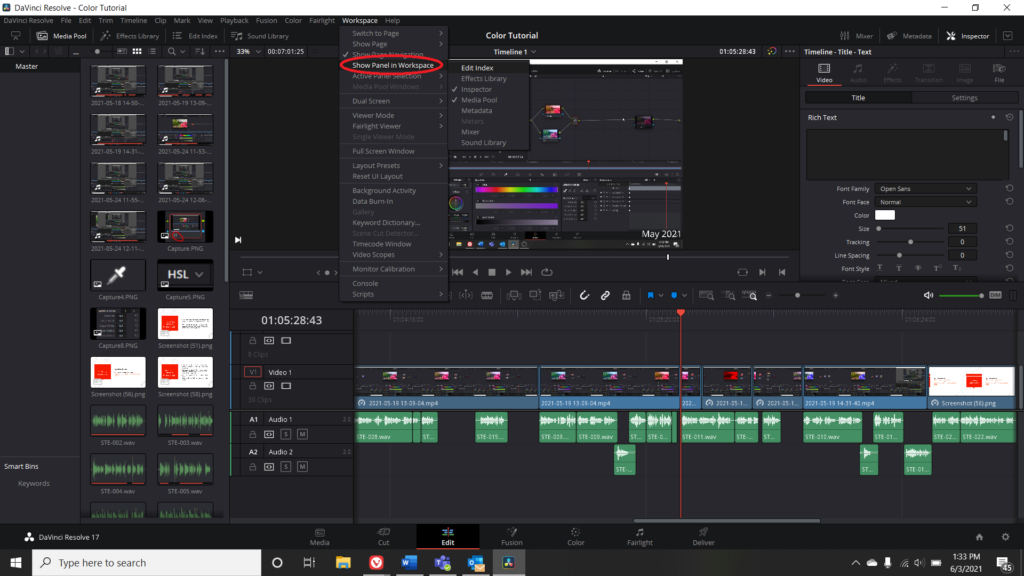
While it may seem that the multiple interfaces offered by DaVinci Resolve offer little room to change what the interface looks like, there are many ways to customize the windows onscreen and make the view suit your needs. The easiest way to do this is to click on the “workspace” option on the top window bar, and hover over the option “show panel in workspace.” This shows a list of all the available windows in your view that you can turn on or off.

Screenshot of DaVinci Resolve

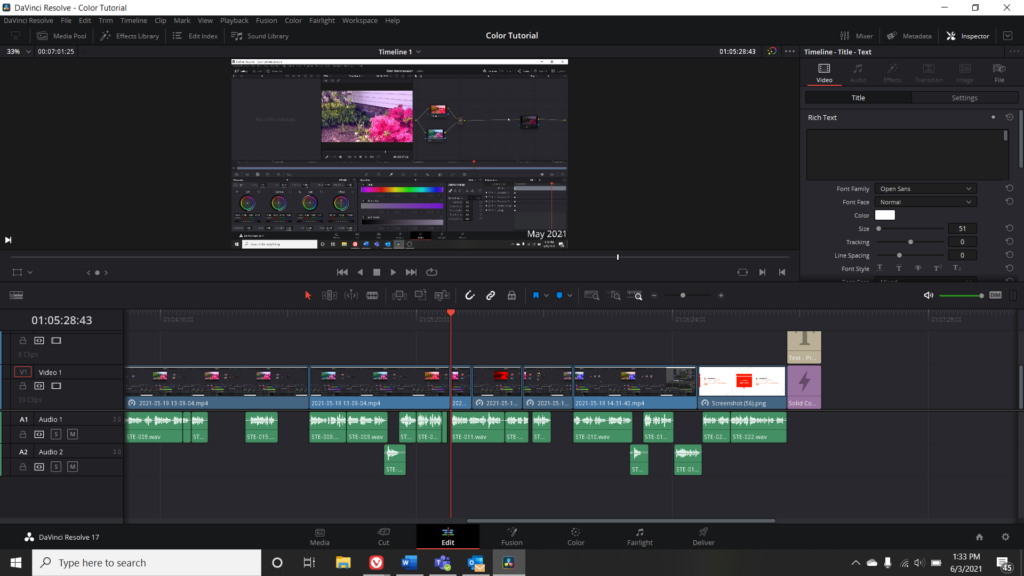
For example, in the media view, I may think I want more space for the timeline, and I am finished with dragging items from the media pool onto the timeline. I can uncheck Media Pool in the list of viewable workspace items, and that makes more room to use the timeline with.

You can also click and drag the margins of each window to scale its size relative to other windows. Unlike Adobe Premiere, Resolve does not offer the ability to pop out a portion of the view into its own window. For this reason, the user experience of DaVinci Resolve is greatly improved by using multiple monitors.

Conclusion
The biggest hurdle for new users of DaVinci Resolve to clear is the unfamiliar interfaces and understanding what the new interfaces are used for. Once you understand that each of the new interfaces reflect their own discrete stage of the editing process, you should get used to the workflow of DaVinci Resolve quickly. Hopefully, this tutorial is able to explain what each of the interface views allows you to do in building a cohesive video project.

Listen to the audio version of this tutorial here:
Studios Staff and Students Record “Protect the Pack”

Last winter, staff members, co-ops, and student employees of the Northeastern University Library Recording Studios joined their collective musical powers to record “Protect the Pack,” a song inspired by the COVID-19 pandemic.

In addition to spreading the word about the importance of face masks and physical distancing to keep the campus community safe, the recording also serves as an example of the type of audio recording capability and support available to Northeastern students, faculty, and staff who need to make recordings while in quarantine.

Cover art of Protect the Pack by The Snell Family Band

The group, which calls itself The Snell Family Band and includes Ben DeUrso, Jonathan Iannone, Chris de Pierro, Patrick Sayers, Jared Zimiroski, Isaac Schutz, and Craig Short, began the project in late November 2020 and completed the initial recordings before the December break. Final mix and updates were completed by the end of February 2021, with cover art and credits by Antonio Banrey.

The group recorded a video on the creation and recording process, which is available in the Digital Repository Service. A music video, created over Zoom and including most of the contributors, was recorded and is in the editing process.

The Recording Studios has hosted a number of online workshops and one-on-one editing sessions over the past year, helping students, faculty, and staff create and edit high-quality audio and video recordings in their homes. Recordings of these workshops are available online.

Music Online Databases Expand Access to Recordings and Scores

Echoes of Love Around the World album cover

Echoes of Love Around the World. Recorded January 1, 2019. ARC, 2019, Streaming Audio.

The Music Online database has long provided access to streaming recordings, scores, and scholarly information from the Jazz Library, Smithsonian Global Sound, Garland Encyclopedia of World Music, and Classical Scores collections. New content has recently been added to this repertoire. You may search each database separately or across the entire Music Online platform.

American Music is a history database that has songs by and about Native Americans, miners, immigrants, slaves, children, pioneers, and cowboys. Included are the songs of the Civil Rights movement, political campaigns, Prohibition, the Revolutionary War, the Civil War, anti-war protests, and more.

Classical Music Library includes more than 76,000 albums from the Medieval period through current times. This database is an excellent complement to the library’s Naxos and Database of Recorded American Music collections.

Classical Scores Library now contains Volumes 2-4, in addition to Volume 1. These scores provide a reliable and authoritative source for scores of the classical canon, as well as a resource for the discovery of lesser-known contemporary works. It includes full, study, piano, and vocal scores.

Contemporary World Music delivers the sounds of all regions from every continent. The database contains important genres such as reggae, worldbeat, neo-traditional world fusion, Balkanic jazz, African film, Bollywood, Arab swing and jazz, and other genres such as traditional music like Indian classical, fado, flamenco, klezmer, zydeco, gospel, gagaku, and more.

Popular Music Library contains a wide range of popular music from around the world, including hundreds of thousands of tracks from major genres in pop music, including alternative, country, electronic, hip-hop, metal, punk, new age, R&B, reggae, rock, soundtracks, and many more.

For more information about other library streaming media collections, check out the Streaming Media guide.


Recording At Home Part 2 Workshop Addendum

This workshop, presented on Wednesday, September 23rd, was the second workshop in a series focused on recording high-quality audio in your own home. Besides providing the basic information about the hardware and software required for recording audio, the motivation behind this workshop was to provide an effective framework for building one’s toolkit of audio recording equipment, with financial responsibility in mind.

Those who record their projects at home are most likely doing so out of necessity rather than choice. This is because recording in an untreated home is always less preferable to recording in a professional studio, even if for no other reason than concerns for acoustic quality. This also means that finances are very likely a concern when choosing what resources to buy/use for recording an audio project. The first thing one should consider when deciding which pieces of audio equipment (hardware or software) to invest in is the needs of the artist creating the project (or your own needs, if you are the artist). This will help determine which parts of a recording setup are most important to you, and therefore which pieces to invest the most money into.

For example, if you plan to do a lot of recording with vocals or acoustic instruments, it would be most wise to spend less (or no) money on things like a premium DAW (digital audio workstation) or third-party plugins. These software elements of a recording setup have no effect on the inherent quality of the audio that is being recorded. This would allow you to invest more of your budget into a high quality microphone and preamp combo, to ensure the captured audio is as clean as it can be. However, if you make most of your music using samples, electronic instruments, or recorded sounds to be edited, then the previously suggested scenario doesn’t make much sense for you. Instead, you would likely be much happier with a simple and inexpensive USB microphone, which eliminates the need for a preamp. This would allow you to instead invest into a premium DAW like Ableton, along with some third-party samplers, sample packs, MIDI peripherals, or other virtual add-ons to expand your electronic music toolkit.

Hopefully, this workshop as given those who are recording at home a more clear picture of which pieces of equipment are most important for their needs. This should help achieve high quality and also minimal cost for recording audio, regardless of the format or intended outcome.

Check here for info on future workshops:

Digital Media Toolkit: Workshops

Library Launches Podcast Publishing Service with Northeastern Classes

Is your class starting a podcast? Several Northeastern classes have adopted podcasting instead of the usual term paper or final project, and the library’s Podcast Publishing Team is here to help. Over the past few semesters, Jon Reed from the Digital Media Studios and Brooke Williams from the library’s Research and Instruction team have worked with classes in English, History, Architecture and other departments to help students learn how to create, record, edit and publish their own podcasts.

One of the questions the team was asked when working with faculty was “how do I get my class assignments into Apple Podcasts?” Using the university’s Digital Repository Service and the Library’s CERES WordPress platform, the Library is able to create a stable website for your class assignment to be sent out to Apple Podcasts, Spotify, and the world. The first podcast published was Speak Up! Podcast, coordinated by English Professor Elly Jackson. 

“The library podcast opportunities are as good as they get and should be blasted all over the campus and around the world,” says Jackson. “My classes set up podcast assignments that have now reached 25 published podcast recordings from undergraduate research, and these are up on Apple Podcasts. I believe educational podcasting has a great future and I am proud of the tram at our library’s podcasting service. This is a stellar partnership and I cherish their talents and commitment to experiential education.”

Some examples of podcast episodes produced by the Speak Up! students include “Death By Chocolate” and “Jet, Set, Go – A Podcast on Medical Tourism.”

Sarah Sweeney, manager of the Digital Repository Service, and Patrick Murray-John, Associate Director for Systems, have both played major roles in getting the podcast publishing program up and running.

Interested in bringing podcasting into your remote classroom? Email the team at Library-PodcastTeam@northeastern.edu. We look forward to working with you closely if even physically afar!